Tuesday, May 25, 2010
My Scalloped Potholder is Finished: Don't Get So Excited...
If you are at all into potholders and can crochet here is the link to the free pattern for the Scalloped Potholder designed by Priscilla Hewitt.
It's not a pot but it's hot!
Happy Kitchen Crocheting!
Friday, April 9, 2010
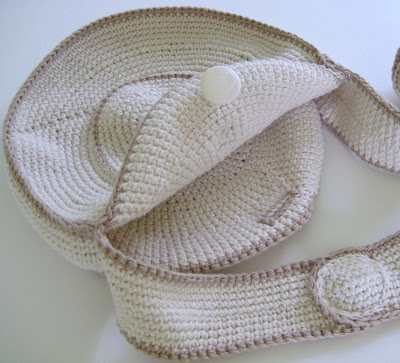
Using My Stash of Finished Objects: My Crocheted Vintage Circle Bag
...one for the top closure.
Now, it is ready for me to use!
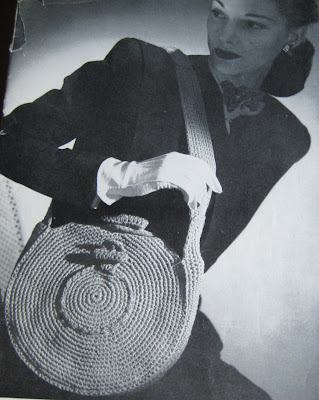
This is the picture of the bag from the original 1950's vintage pattern.
I wonder what my fellow fiberistas are up to this Fiber Arts Friday? See you over at Wonder Why Gals to find out!
Happy Fiber Arting!
Thursday, January 14, 2010
Ribbed Hat is Over and Done With!
I didn't knit it as long as the pattern called for because it would have been too long for a beanie. I started my decreases when the hat measured about 7 inches. As you can see, it fits hubby's 23 inch head perfectly.
This is such an easy pattern. Great for any beginning knitters out there.
Happy Knitting!
Monday, September 7, 2009
Felting for Your Cat: A Mouse and a Kitty Bed
My SPCA rescue cat Amelia was welcomed into our home with presents of felted mice and a felted cat bed. As we like to say, she loves her meeses to pieces! Her two mice are now a year old and still going strong. At night, she likes to carry one around in her mouth like prey. By day, she can be found chasing and beating up her mice without mercy. They are very sturdy and surely have lasted longer than any store bought toy would.
I knit them in a bulky wool and hand felted them stuffing each with fiberfill. The easy to knit unique one piece pattern for these felted mice can be found at Knitting on the Net.
Here is Amelia in her knit and felted cat bed. She loves to curl up into it for a nap, or sit in it while she watches birds from our office window.
This is a really fun project to make for your cat or as a gift for your favorite cat owner. This too is almost a year old, and has held its shape well. It's made from the same bulky wool as her mice. After felting it in the washer and while still wet, I used the rim of my largest metal mixing bowl as a form for the shape. I trimmed it with pink eyelash yarn for a bit of whimsy.
This pattern with lots of pictures of other Kitty Beds can be found at Wendy Knits.
If you have a small dog, I'm sure they would appreciate one of these beds too!
Happy felting!
Thursday, May 28, 2009
Fiber Jewelry: How To Make Crochet Rings
 Designing and wearing your fiber jewelry is a creative way to express your individuality. You choose the technique, texture, colors and embellishments for each piece.
I like using crochet to create my fiber jewelry. Crochet is a fiber art that both beginners and experts can easily use to create beautiful wearable fiber art.
I used a 4.5 mm / U.S 7 crochet hook to work with this medium yarn.
Your best friend for creating crochet rings is the trusty single crochet. This basic stitch is easy to use to give your work structure and a closed stitch.
Start your crochet ring by creating a foundation chain that is long enough to fit around your finger. I made 10 chains with my cotton yarn using a 4.5mm/ 7 U.S. hook. My ring fits an average adult female finger. Remember, your ring will have some stretch room since it is crocheted.
When you have your chain completed, you must join the end of the chain to the beginning to form a ring with a slip stitch. Be careful not to twist your ring, as you are now going to crochet in the round. There will be no seam to sew! See my previous blog post for a photo showing this.
Do not turn as you will be crocheting around the ring.
1st row: Chain (ch) 1 and single crochet (sc) in each ch of the foundation chain. Slip stitch (sl st) to join the end of the round to the beginning of the round.
2nd row: Ch 1. Sc in each sc around. Sl st to join the end of the round with the beginning. Fasten off and weave in your ends. It should look like a ring!
Now, here is the fun part. Embellish your ring. For the fiber ring pictured above, I used a vintage button that has sparkle. You could sew on beads, sequins or use embroidery floss to stitch a design. Happy Crocheting.
Friday, May 22, 2009
Simple Crocheted Flower: How To Tutorial
 This crocheted flower is a simple design great for beginners. I learned this pattern years ago. Many flowers later, I now know it off by heart.
Round One: Ch 4. Then make *1 half double crochet (hdc) into the ring and ch 3*. Repeat from * to * 5 times. Join to the beginning (beg) of the round with a sl st into the 2nd ch of the ch 4 that you started the round with. You should have 6 loops. Your work should now look like this:

Round 2: You are now going to add petals to your blooming flower. In each of your 6 loops, make 1 single crochet (sc), 1 hdc, 1 double crochet (dc), 1 hdc, 1sc. Join to the beg of the round with a sl st in the 2nd ch of the ch 4 you started the round with. I hope your flower now looks like this:

Round 3: In this round, you will be making chains behind each petal. As in the photo below, ch 4.


