


Saturday, October 31, 2009
Friday, October 30, 2009
Thrummed Mittens: The Finale Sorta
One finished thrummed mitten. Beautiful, isn't it? I feel like I'm imposing my baby pictures on you.

Yes, I know I must knit its partner. I'll be casting on for that this weekend.
See this mitten from its humble beginnings: part one, part two and part three.
It was fun to try something new. Any ideas what I can get my needles into next?

Yes, I know I must knit its partner. I'll be casting on for that this weekend.
See this mitten from its humble beginnings: part one, part two and part three.
It was fun to try something new. Any ideas what I can get my needles into next?
Thursday, October 29, 2009
Los Angeles Pottery and Flintwood Salad Servers this Vintage Thingies Thursday
A vintage 1956 “Spaghetti Dinner” pasta bowl reminds me of delicious potato salad which was often served in this bowl by my mom.

This bowl was in mint condition until I got my paws on it! I chipped the edge a few years ago. I still cringe at the memory.
The bottom of the bowl says it was “Made in U.S.A.” in 1956 in Los Angeles, California. I cannot make out the manufacturer.

These chipped and worn 1960’s orange Flintwood melmac salad servers are inseparable from this bowl. They were used to serve the potato salad. I understand they too were made in California. I guess their pairing with the pasta bowl was meant to be!
Now, go on over to Coloradolady to see more vintage treasures!
Happy VTT!

This bowl was in mint condition until I got my paws on it! I chipped the edge a few years ago. I still cringe at the memory.
The bottom of the bowl says it was “Made in U.S.A.” in 1956 in Los Angeles, California. I cannot make out the manufacturer.

Now, go on over to Coloradolady to see more vintage treasures!
Happy VTT!
Tags:
1956,
flintwood,
los angeles,
melmac,
orange,
pasta bowl,
salad fork,
salad spoon,
servers,
spaghetti dinner,
vintage
·
14
Comments

Wednesday, October 28, 2009
Wool-less Wednesday: Halloween Witches' Fingers Cookies
These Halloween witches' fingers cookies have got to be the grossest things I have ever baked. Looking too real for comfort, they are always a hit at Halloween.

I cannot take the credit for these beauties above. 5boys2cook4 is the creative talent behind this batch of ugliness.
I have made these freakish cookies many Halloweens using a recipe from Canadian Living Magazine claimed to be their most popular Halloween recipe ever.
Using a shortbread cookie dough, you shape pieces of the dough into cylinders and mould them to look like a gnarled fingers. Red cake decorating gel and almonds create the disgusting fingertips.
Happy Halloween Baking!
Photo by 5boys2cook4
I have made these freakish cookies many Halloweens using a recipe from Canadian Living Magazine claimed to be their most popular Halloween recipe ever.
Using a shortbread cookie dough, you shape pieces of the dough into cylinders and mould them to look like a gnarled fingers. Red cake decorating gel and almonds create the disgusting fingertips.
Happy Halloween Baking!
Tags:
baking,
canadianliving,
cookies,
halloween,
recipe,
treats,
witches fingers,
woolless wednesday
·
0
Comments
Tuesday, October 27, 2009
Thrummed Mittens: Part Three
I now have one thrummed mitten sans thumb complete. See where my afterthought thumb is in place? It will magically appear from the green stitches.

Not being able to figure out how to properly execute an afterthought thumb from Yarn Harlot's instructions, I found a superb tutorial on A Kitten Knits showing how the big girls do it. Ta dah!

I've impressed myself with the magic of this thumb opening. Next, a finished thrummed mitten.
Happy thumbs!
Tags:
instructions,
knitting,
mittens,
mitts,
thrummed mittens,
thrums,
thumb,
yarn harlot
·
0
Comments
Sunday, October 25, 2009
Thrummed Mittens: Part Two
Wow! I actually have thrums inside a mitten. After knitting the cuff to my first mitten, I was ready to experience thrumming for the first time.

Will it ever be safe to go back into my yarn stash again? It's Thrum Jaws!

Its the Great White Mitten for the Great White North.
Thrumming is addictive. I keep looking down inside my mitten to see the secrets hidden inside. I yearn for my next row of thrums.

I think my thrums may be a bit small. But, size isn't everything. Needless to say, I am having fun. I'm getting ready to place my "afterthought" thumb following Yarn Harlot's instructions.
Happy mitten making!
Friday, October 23, 2009
Thrummed Mittens: Part One
I've decided my next knitting project will be thrummed mittens using Yarn Harlot's pattern from a Thrum-a-long she hosted in 2004! Oh well, better late than never! I found the pattern on Ravelry where you can see pictures of what my mittens should look like when they are finished.
Thrummed mittens are said to originate from Newfoundland and Labrador. Even though I have Newfie connections, I had never heard of them until my Knitting Daily e-mail from Interweave featured them.
I'm using Briggs and Little Hertiage wool in Mulberry for the body of the mittens.
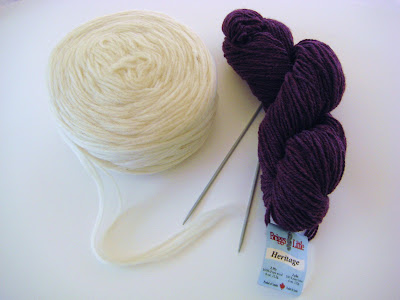
The special and unusual thing about these mittens is that they are lined with thrums or rolled strips of roving which are knit into the mittens on the inside. When finished, you have mittens full of thrums which are extra warm and soft. Great for our Canadian winters!
Here are my first ever thrums! I am so proud.

I'll be casting on soon.
Happy Thrumming!
Tags:
briggs little,
free pattern,
knitting,
mittens,
mitts,
ravelry,
roving,
thrummed mittens,
yarn harlot
·
1 Comments
Thursday, October 22, 2009
Japanese Luster Ware this Vintage Thingies Thursday
This vintage Japanese luster ware seasoning set with mustard pot, salt and pepper shakers in a handled base spends most of its time in my cupboard. I bought this set in a small antique store too many years ago.

You can see that the spoon for the mustard pot is missing which is how I bought it.

I like the blue and orange color combination.

I don't know when this would have been made in Japan, but I assume it is post 1940's.
Happy Vintage Thingies Thursday at Coloradolady!

You can see that the spoon for the mustard pot is missing which is how I bought it.

I like the blue and orange color combination.

I don't know when this would have been made in Japan, but I assume it is post 1940's.
Happy Vintage Thingies Thursday at Coloradolady!
Wednesday, October 21, 2009
Wool-less Wednesday: Useful Websites for Being Creative with Your Blog
Resources for setting up and customizing your blog allow you to extend your creativity beyond the content of your blog.

Here are some websites that allow you to do just that:
* Three Column Blogger is a sight that gives you detailed instructions on how to change your Minima Blogger Template from two columns to three columns. You will have to edit the HTML of the original Blogger template. Don't let this stop you from trying it, if you would really like a three column blog. You save your original blog template before editing the HTML. If you mess up, you have the original safe on your hard drive.
* HTML color codes are easily accessible in this chart. Even though Blogger allows you to easily customize your blog's colors by clicking on color blocks when in the Fonts and Colors menu in Layout, this chart expands the range of colors you can choose. Just copy the HTML color code of your choice from the chart and paste it into the "Edit Color Hex Code" box found in Fonts and Colors. Press enter and voila the color changes for whatever part of your blog you have selected!
* Web Resizer is a nifty tool that allows you to resize and enhance the quality of your blog photos whether for posts or your banner. Check out the feature that allows you add a border to your photo. You can also visit Picresize which offers some more cool ways to modify your pictures.
I hope these websites are useful for being creative with your blog.
Happy blogging!
Friday, October 16, 2009
How to Knit Cables: A Knitting Tutorial
Knitting cables has got to be one of my favorite techinques in knitting. Cables look difficult to the uninitiated beginner, but they are quite simple.
This tutorial will show you how to knit an 8-stitch cable as part of a knit panel. Make many panels and sew them together into an afghan. Make the panel just the right length for a scarf.
To make my panel, I used a medium weight yarn and a pair of 6 mm (10 US) needles. For your cables, you'll also need either a double pointed needle or a cable needle with the funny bend that I suppose is there to prevent your stitches from falling off. I use a plain old double pointed needle for my cable needle which has served me well for an infinite amount of cabling!
To get started:
Cast on 24 stitches. Knit 4 rows of garter stitch ending with a purl row. Next row is the right side of panel.
![]()
You are now ready to set up your foundation row for the cabled panel.
1st row: (Right side). K 4, P 4, K 8, P 4, K 4
2nd row: P4, K4, P8, K4, P4
Your work should now look like this:
![]()
This is where cable patterns can get scary for first-timers.
3rd row: K4, P4, C8B, P4, K4
Don't panic! C8B means CABLE 8 BACK. You simply slip the next 4 stitches onto your trusty cable needle and take it to the back of your work. Here is what the cable needle will look like at the back of your work.
![]()
Knit the next 4 stitches from the left-hand needle not the cable needle which is still to the back of your work.
![]()
This is what your work will look like after you knit the stitches from the left-hand needle.
![]()
And then, knit the 4 stitches off of the cable needle.
![]()
Your first cable twist complete !
This is what your work will look like when you finish the 3rd row.
![]()
4th row: P4, K4, P8, K4, P4
5th row: As 1st row.
6th row: As 2nd row.
7th row: As 1st row.
8th row: As 2nd row.
These 8 rows complete one cable pattern. Repeat these 8 rows until your panel is the length you want it.
This is what your panel will look like with another cable twist.
![]()
To end your panel: after completing a row 8, repeat 1st and 2nd rows once. Knit 4 rows of garter stitch to match the beginning of the panel and cast off.
For a thrill, try C8F. Bring you cable needle to the front of your work. What happens?
Happy cabling!
This tutorial will show you how to knit an 8-stitch cable as part of a knit panel. Make many panels and sew them together into an afghan. Make the panel just the right length for a scarf.
To make my panel, I used a medium weight yarn and a pair of 6 mm (10 US) needles. For your cables, you'll also need either a double pointed needle or a cable needle with the funny bend that I suppose is there to prevent your stitches from falling off. I use a plain old double pointed needle for my cable needle which has served me well for an infinite amount of cabling!
To get started:
Cast on 24 stitches. Knit 4 rows of garter stitch ending with a purl row. Next row is the right side of panel.

1st row: (Right side). K 4, P 4, K 8, P 4, K 4
2nd row: P4, K4, P8, K4, P4
Your work should now look like this:

This is where cable patterns can get scary for first-timers.
3rd row: K4, P4, C8B, P4, K4
Don't panic! C8B means CABLE 8 BACK. You simply slip the next 4 stitches onto your trusty cable needle and take it to the back of your work. Here is what the cable needle will look like at the back of your work.

Knit the next 4 stitches from the left-hand needle not the cable needle which is still to the back of your work.

This is what your work will look like after you knit the stitches from the left-hand needle.

And then, knit the 4 stitches off of the cable needle.

Your first cable twist complete !
This is what your work will look like when you finish the 3rd row.

4th row: P4, K4, P8, K4, P4
5th row: As 1st row.
6th row: As 2nd row.
7th row: As 1st row.
8th row: As 2nd row.
These 8 rows complete one cable pattern. Repeat these 8 rows until your panel is the length you want it.
This is what your panel will look like with another cable twist.

To end your panel: after completing a row 8, repeat 1st and 2nd rows once. Knit 4 rows of garter stitch to match the beginning of the panel and cast off.
For a thrill, try C8F. Bring you cable needle to the front of your work. What happens?
Happy cabling!
Tags:
cable needle,
cables,
how to,
instructions,
knit,
knit cables,
knitting,
photos,
tutorial
·
0
Comments
Thursday, October 15, 2009
Delft Tiles this Vintage Thingies Thursday
These vintage Delft tiles were bought at a yard sale over 13 years ago from a lady who was clearing out her late mother’s home. She told me that her mother had them for many years, but she did not know their history. The question is are they authentic tiles or are they 20th century tiles simply made for the tourist market?
This first tile may be decorated with the image of a broom-maker.
![]()
![]()
![]()
This first tile may be decorated with the image of a broom-maker.

I'm not sure who this image represents on this second tile, but it appears to be a nobleman.

This is a close-up of the ox-head corner motif.

I like speculating about the origins of these tiles. Are they English or Dutch? How old are they? I haven't be able to answer these questions yet. May be some day...
Happy Vintage Thingies Thursday at Coloradolady!
Happy Vintage Thingies Thursday at Coloradolady!
Wednesday, October 14, 2009
Wool-less Wednesday: Button Blog!


Being a devotee to the humble button myself, I enjoy seeing other button treasures. Do you?
Here are some of my vintage buttons.
Happy buttons!
Sunday, October 11, 2009
Sunday Summary: As the Leaves Turn
It rained most of this week. Finally, today there is sun and brilliant blue sky on this Canadian Thanksgiving weekend. I took advantage of the weather to enjoy the outdoors and the vibrant fall foliage of the birch and maple trees.
![]()
![]()
The warmth of wooden buttons suit the thickness and cozy texture of the rib knitting.
I have a baby blue neck warmer currently being knit on my needles and hope to finish it soon.
I'm now off to prepare our Thanksgiving dinner which we have on Sunday before the holiday Monday. Lamb is on the menu!
Happy Canadian Thanksgiving!

As the leaves turned, I continued to create neck warmers this week. This one is a rich dark brown color and unlike last weeks creation is not in the style of a collar.

I have a baby blue neck warmer currently being knit on my needles and hope to finish it soon.
I'm now off to prepare our Thanksgiving dinner which we have on Sunday before the holiday Monday. Lamb is on the menu!
Happy Canadian Thanksgiving!
Friday, October 9, 2009
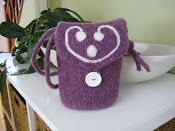
Felting: The Little Coco Bag
The famous Little Coco Bag has to be one of my favorite felted bags of all time!
![]()
It is designed by Diane Sutliff who offers the patten free at her blog Felted Handbag Workshop.
Once you've tried this pattern, you'll want to make more than one!
You can see all of the wonderful interpretations of this bag on Ravelry. You'll need to log in.
Happy Felting!

It is designed by Diane Sutliff who offers the patten free at her blog Felted Handbag Workshop.
My bag is knit with two strands of Patons Classic Merino Wool. The finished product is a stiff bag with form. It's exactly what I was looking for in a felted bag.
![]()
The straps are pulled though grommets in the sides of the bag which is a nice detail.
Once you've tried this pattern, you'll want to make more than one!
You can see all of the wonderful interpretations of this bag on Ravelry. You'll need to log in.
Happy Felting!
Tags:
felted,
felting,
fiber art,
handbag,
knit,
knitting,
little coco bag,
purse,
ravelry
·
1 Comments
Thursday, October 8, 2009
Vintage Thingies Thursday: 1950s Sweater Pattern Book
I love flipping through the pages of vintage pattern books especially if there are color photographs illustrating the fashions of the time. I especially like this Star Sweater Book No. 92. Published by the American Thread Company in 1952, it would have only set you back 10 cents to buy!
![]()
Look at the fresh 50's faces of these models. Eyebrows and lips seem to be the focus of the face with lots of waves in the hair. The sweaters these gals are wearing are knit from the same pattern with variations in the trimming to make each individual.
![]()
This snazzy Bolero vest is knit in simple garter stitch using sport weight yarn. Sequins and beads are used to give the vest some flash. I want her blouse and skirt!
![]()
I left my favorite sweater for last. This crocheted Stole Blouse in buttercup yellow is so unique. The stole is crocheted separately from the blouse. The buttons are sewn to the blouse. Then, the stole is buttoned to the blouse. I love that!
There are more Vintage Thingies at ColoradoLady.
Happy Vintage Thingies!

Look at the fresh 50's faces of these models. Eyebrows and lips seem to be the focus of the face with lots of waves in the hair. The sweaters these gals are wearing are knit from the same pattern with variations in the trimming to make each individual.


I left my favorite sweater for last. This crocheted Stole Blouse in buttercup yellow is so unique. The stole is crocheted separately from the blouse. The buttons are sewn to the blouse. Then, the stole is buttoned to the blouse. I love that!
There are more Vintage Thingies at ColoradoLady.
Happy Vintage Thingies!
Wednesday, October 7, 2009
Wool-less Wednesday: Delicious Yeast Free Bread
Fresh from the oven, this yeast free bread is tasty slathered in orange marmalade! This bread is a cross between a quick bread and a soda bread. We bake it many times a week in our kitchen.
![]()
Yeast Free Bread
Preheat your oven to 390F or 200C. Grease a 9x5 loaf tin.
Ingredients:
3 cups (750 ml) wholewheat flour
1 tsp (5 ml) baking powder
1 tsp (5 ml) baking soda
1/4 cup (125 ml) rolled oats
2 cups (500 ml) buttermilk or 2 cups of milk soured with about 3 tbsps (45 ml) white vinegar
2 tbsps (30 ml) canola oil
If you're souring your own milk, sour it about an hour ahead of time to make sure your milk is well curdled. Sometimes, we sour our milk overnight in the fridge and bake a bread first thing in the morning.
Method:
1. Combine the dry ingredients in a large bowl.
2. Add the oil to your buttermilk or soured milk.
3. Make a well in the center of your dry ingredients and add your liquid.
4. Mix just enough to combine.
5. Pour into your greased loaf tin.
6. Bake for 50 minutes. Remove from tin to cool on a wire rack.
![]()

Yeast Free Bread
Preheat your oven to 390F or 200C. Grease a 9x5 loaf tin.
Ingredients:
3 cups (750 ml) wholewheat flour
1 tsp (5 ml) baking powder
1 tsp (5 ml) baking soda
1/4 cup (125 ml) rolled oats
2 cups (500 ml) buttermilk or 2 cups of milk soured with about 3 tbsps (45 ml) white vinegar
2 tbsps (30 ml) canola oil
If you're souring your own milk, sour it about an hour ahead of time to make sure your milk is well curdled. Sometimes, we sour our milk overnight in the fridge and bake a bread first thing in the morning.
Method:
1. Combine the dry ingredients in a large bowl.
2. Add the oil to your buttermilk or soured milk.
3. Make a well in the center of your dry ingredients and add your liquid.
4. Mix just enough to combine.
5. Pour into your greased loaf tin.
6. Bake for 50 minutes. Remove from tin to cool on a wire rack.

Enjoy!
Happy baking!
Monday, October 5, 2009
Whiskers and Wool: Men Who Knit
Do you know of any men who knit? I know men knit, but I don't know any men who knit.
I got thinking about this when I discovered BrianKnits! on Twitter. Brian is a knitter who blogs about his love of knitting. Take a look at his lovely triangle shawl.
Further investigation of the male knitter led me to Men Who Knit which is an online community for, who else, men who knit. It has 3078 registered users! There are a lot of guys knitting out there.

There are so many men blogging about their passion for knitting. Asplund Knits of Sweden has examples of his skillful knitting on his blog. I love his Twined and Stranded Mittens.
Then there is Queer Joe's Knitting Blog which is entertaining to read with more great knitting. This is Joe's excellent tutorial Seaming a Sweater Sleeve. Joe where were you when I was trying to figure this out?

At MenKnit there is an interesting history of men and knitting. There is also a list of more men's knitting blogs you can explore.
Happy Knitting Guys!
I got thinking about this when I discovered BrianKnits! on Twitter. Brian is a knitter who blogs about his love of knitting. Take a look at his lovely triangle shawl.
Further investigation of the male knitter led me to Men Who Knit which is an online community for, who else, men who knit. It has 3078 registered users! There are a lot of guys knitting out there.
There are so many men blogging about their passion for knitting. Asplund Knits of Sweden has examples of his skillful knitting on his blog. I love his Twined and Stranded Mittens.
Then there is Queer Joe's Knitting Blog which is entertaining to read with more great knitting. This is Joe's excellent tutorial Seaming a Sweater Sleeve. Joe where were you when I was trying to figure this out?
At MenKnit there is an interesting history of men and knitting. There is also a list of more men's knitting blogs you can explore.
Happy Knitting Guys!
Sunday, October 4, 2009
Sunday Summary: Dancing with Wool
I resumed my passion for belly dancing this week while knitting my way to winter with neck warmers.
![]()
Alas, this is not me....
I''ve cheated and used a stock photo. But, it represents my belly dancing spirit!
I hadn't danced for many years. It was surprising how my body remembered many of the movements that I had etched into its neurons years ago. I suppose it would be a similar experience to putting down my knitting needles for years and picking them up again. My hands would remember the rhythm of the needles like my body seemed to remember the rhythm of the dance.
Dance is another creative outlet for me. Come on all you fiberistas, what other ways do you express your pent up creativity?
Happy creativity!
Friday, October 2, 2009
Fiber Arts Friday: My New Winter Neck Warmer
I can no longer deny that winter will come. So, my newest creation is this neck warmer which I was experimenting with on my knitting needles this week. Using 12mm needles and double strands of a chunky yarn, it is knit in an uneven rib pattern. The result is big on thickness and texture.

I crocheted a placket for the buttonholes. Wooden buttons add interest and warmth to the piece complimenting the rusty orange yarn.
I wonder if the other fiberistas are thinking about winter this Fiber Arts Friday? Go see at Alpaca Farm Girl.
Happy winter knitting!

I crocheted a placket for the buttonholes. Wooden buttons add interest and warmth to the piece complimenting the rusty orange yarn.
I wonder if the other fiberistas are thinking about winter this Fiber Arts Friday? Go see at Alpaca Farm Girl.
Happy winter knitting!
Tags:
chunky yarn,
crochet,
double strand,
fiber art,
fiber arts friday,
knitting,
neck warmer,
scarf,
winter
·
0
Comments
Thursday, October 1, 2009
Vintage Thingies Thursday: Vintage Kenmore Sewing Machine
This is a vintage 1950's Model 48 Kenmore Sewing Machine. This warhorse is a tough machine that has done everything from making Barbie doll clothes to altering kilts! It is heavy and sturdy and still sitting in its original solid wood cabinet. It's in use today. The last job it did for me was to sew the lining into one of my crochet bags.

This is the original vintage buttonholer attachment that came with the machine. The buttonhole templates fit inside the buttonholer and guide the needle around the fabric to make different sizes and shapes of buttonholes. I have used this attachment with great success!

I have never used this vintage decorative and embroidery stitch attachment which makes a variety of unique stitch patterns, as you can see if you look closely at the manual. You put the plastic discs into top of the machine. They tell the needle where to stitch. No computers here!


Finally, here is the original manual. I understand they can be hard to find. I'm very fortunate to have a such a complete package with my vintage sewing machine thanks to my Mom who gave me the machine!

I enjoyed sharing this vintage thingie with you. For more vintage thingies, visit Coloradolady for Vintage Thingies Thursday.
Happy Vintage Thingies!